
Radius
In order to ensure universal utilization of the software for the management of the Internet network, independent RADIUS module is implemented in ISPadmin to enable client verification.
Basic module information
Radius module provides especially for the following:
- Verification via username and password, or MAC address
- Support of HotSpot MikroTik system / PPPoE support
- Statistics of verified clients
- Graphs of clients´ traffic
- Authorization for WINbox / SSH
- Verification of technician accesses into MikroTik routers
More information available at:
Purchase
This is a separate module which is not part of the basic system installation, and thus needs to be purchased separately. For more information re trials and/or activation of the module, contact our Sales Department at This email address is being protected from spambots. You need JavaScript enabled to view it..
Module installation
The installation is performed by our technical support. They will upload a new license with Radius module while installing the module.
If you used the module in the past and need to have it up and running following a system migration / re-installation, follow this guide.
If you´re installing Radius for the first time, you will need to do the following to switch the module on:
Get current password to your database
cat /data/support/ispadmin/config/config.php |grep DBPASS
Write the mysql password to /etc/freeradius/sql.conf, replacing default password isp123.
nano /etc/freeradius/sql.conf
# Connection info:
server = "localhost"
login = "ispadmin"
password = "isp123"
Edit /usr/share/freeradius/dictionary file and check if $INCLUDE dictionary.mikrotik row is present If not, write it there.
nano /usr/share/freeradius/dictionary
Restart Radius
/etc/init.d/freeradius restart
Setting up ISPadmin to verify clients via Radius
Adding a new Radius tariff
In Settings Tariffs Internet, select Radius client type, fill in tariff description, abbreviation, and price. Client´s speed will be set according to values in Download, Upload, Burst limit, Burst threshold, Burst time, and Priority. Add the tariff to a client while adding a service.
Speed-limitation attribute will be created automatically based on tariff speed setup, yet you have an option to change its parameters by manually adding Mikrotik-Rate-Limit attribute. You may add more attributes to a tariff manually, either to all Radius clients (in Settings Tariffs Internet, click on ), or to an individual client.
If you use Unlisted tariff for a client, defined speeds won´t be applied to the configuration, and you will have to add Radius parameter with the requested speed manually to the client. So please use Unlisted tariff rarely.
Radius-oriented router configuration
Set up router in ISPadmin
When editing a router, check the Activate radius box, and fill in Password for communication with radius. A brown Radius button will be displayed in router header when Radius is activated. Click on it to get more information about Radius on the router (see Router Description > Basic router info > RADIUS), such as a number of in-/active clients or clients without a router. Also, you may unlock all clients who are locked to a router. You can do so in Hardware Routers Radius Account Statistics, too.
Mikrotik setup
- Click on + to create New Radius Server in Radius menu.
- Fill in the following parameters:
| Service | wireless (Check also ppp, if you need to verify PPPoE services) * |
| Address | IP address of ISPadmin server |
| Secret | Password used while editing a router as Password for communication with radius. |
| Authentication Port | 1812 |
| Accounting Port | 1813 |
| Accounting Backup | no |
* In MikroTik, for ppp service check Use Radius and Accounting in PPP > PPP Authentication & Accounting menu.
/ppp aaa print
use-radius: yes
accounting: yes
interim-update: 10s
Then just each Radius-service type client needs to have the proper tariff. You may then debug individually each PPPoE service in MikroTik based on its profile etc.
Verification of technicians on MikroTik routers via Radius
If you have bought the RADIUS module, activated it and set it properly, you can use the Mikrotik login function. If you do not know whether the RADIUS module in your application is active or not, you can check it out in Clients Home.
If you decide to use it, you will not have to set up special accounts for technicians (with corresponding rights) on each router. Also, when a technician leaves your company, it will not be necessary for you to remove their accounts on all routers. Access to the RADIUS server is automatically configured, which enables MikroTik login for technicians (through WinBox, SSH etc., depending on the rights settings). Manual configuration of all routers is thus unnecessary, which speeds up the whole process.
To activate the management of technicians’ access rights to routers, you have to set the service_mikrotik_login key to 1 in Settings Syst. settings Mikrotik. By doing this, you activate the MikroTik login through RADIUS feature on all routers in the system.
By default, a given administrator has access to all routers.
If you do not want anyone to have access to a certain router (for example: main gateway or CORE router), then you can uncheck the Login of technicians to Mikrotiks via Radius box in the settings of a given router in Hardware Routers All. If this box is not checked, it is not possible to log in through any account created in Settings Administrators Mikrotik Login.
If everything is set correctly and you start RADIUS, the system automatically activates communication with the RADIUS server on all routers, sets up relevant access groups (information about individual groups’ rights must be saved directly to routers) and allows technicians to log in according to their authorization.
![]() ATTENTION
ATTENTION ![]()
If you want to use this function, it is necessary to check the setting of the server_ip key in Settings Syst. settings General. You have to enter here the IP address of the ISPadmin server that is accessible from all routers. This IP address will be set as the IP address of the RADIUS server on all routers. If you set it incorrectly, access to routers through RADIUS will not be possible because of a non-existent RADIUS server.
The MikroTik login through RADIUS feature is functional only if the RADIUS module in the ISPadmin system is activated. If it is not activated, the feature is not functional.
You can easily check whether and how the function works by having a technician connect to one of the routers or through WinBox - in the Radius menu and in the System / Users / Groups menu.
Groups
On this page, you can define in detail the rights of individual groups that will be used for the management of technicians’ access to routers. Then you assign individual users (technicians) to the groups you have created. You may create as many groups with various rights as possible.
A new group can be added by clicking on + Add group. On the page that appears, enter the name of a given group and set the individual rights the way you want. You can also modify the settings in the overview of existing groups. There is a list of rights for each group along with information about how you have configured them (![]() /
/ ![]() ). You can change the configuration by clicking on individual icons.
). You can change the configuration by clicking on individual icons.
You can set the following rights:
| local | A given group of technicians is / is not allowed to log in through a local console. |
|---|---|
| telnet | A given group of technicians is / is not allowed to log in through telnet. |
| ssh | A given group of technicians is / is not allowed to log in through SSH. |
| ftp | A given group of technicians is / is not allowed to log in through FTP. Such technicians can read, write and delete. |
| reboot | A given group of technicians is / is not allowed to reboot a router. |
| read | A given group of technicians is only allowed to read. No configuration changes are possible. |
| write | A given group of technicians is / is not allowed to modify configurations (with the exception of user management - setting up further user accounts for access to routers). If you want to allow this group to read as well, you have to modify the read item accordingly. |
| policy | A given group of technicians is / is not allowed to set up further administrator accounts for access to routers. |
| test | A given group of technicians is / is not allowed to carry out the following tests: ping, traceroute, bandwidth-test, wireless scan, sniffer a snooper. |
| web | A given group of technicians is / is not allowed to log in through the web interface. |
| winbox | A given group of technicians is / is not allowed to log in through WinBox. |
| password | A given group of technicians is / is not allowed to change passwords to individual user accounts. |
| sensitive | A given group of technicians is / is not allowed to see sensitive data, such as passwords, wireless keys etc. |
| api | A given group of technicians is / is not allowed to log in through API. |
| sniff | A given group of technicians is / is not allowed to use a sniffer utility. |
You can edit a particular group by clicking on ![]() .
.
You can delete a particular group by clicking on ![]() .
.
Clients
You can add a new user (technician) by clicking on + Add user. Enter the login name and password of a given technician on the page that appears. Since every single user has to belong to a certain group (with a given set of rights), assign this technician to a particular group. Furthermore, you can add a note to them. Finish the process by clicking on Save.
The overview of users contains the following details: user, group and note.
You can edit a particular user by clicking on the ![]() icon.
icon.
You can delete a particular user by clicking on the ![]() icon.
icon.
Examples of configuration
PPPoE Server
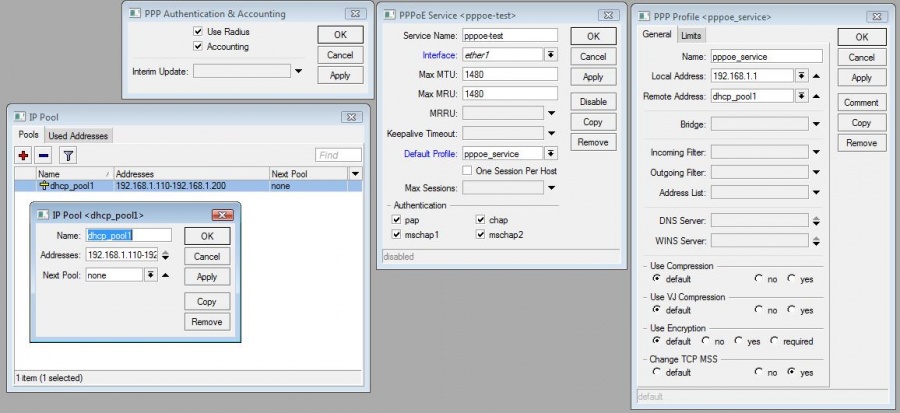
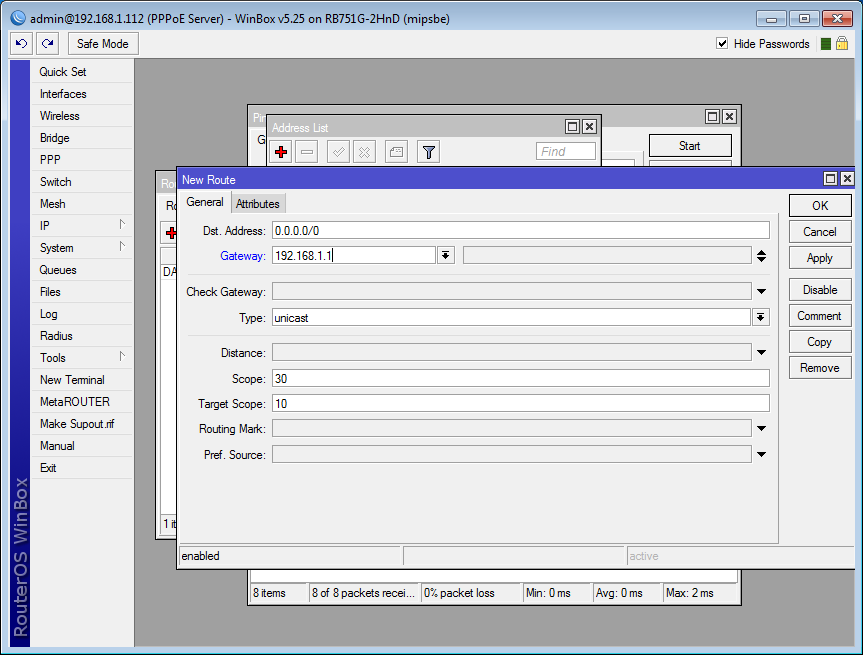
| Set up IP address on eth1 - 192.168.1.112/24 | Set up default gateway - 192.168.1.1 | Create PPPoE profile | Add bridge for PPPoE |
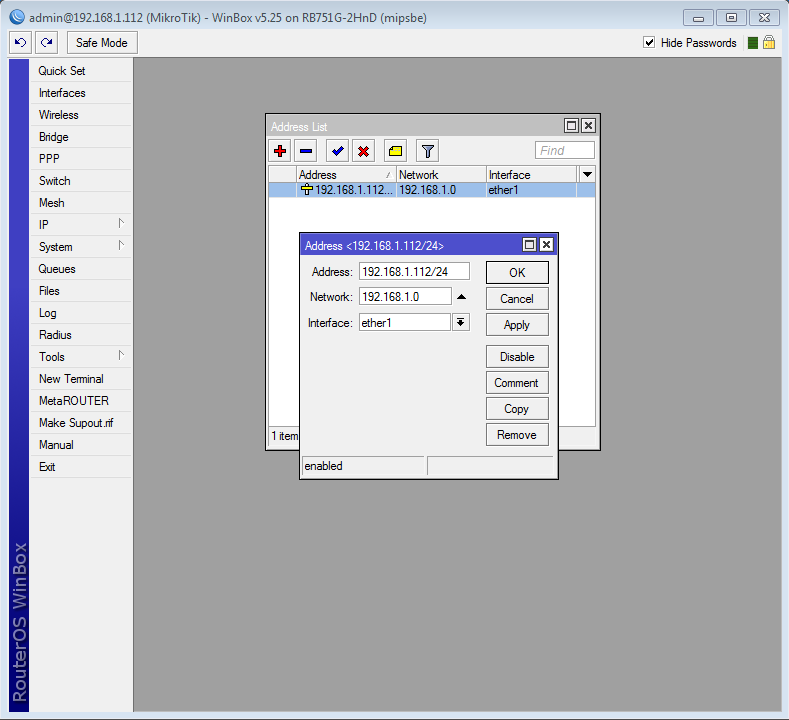 |
 |
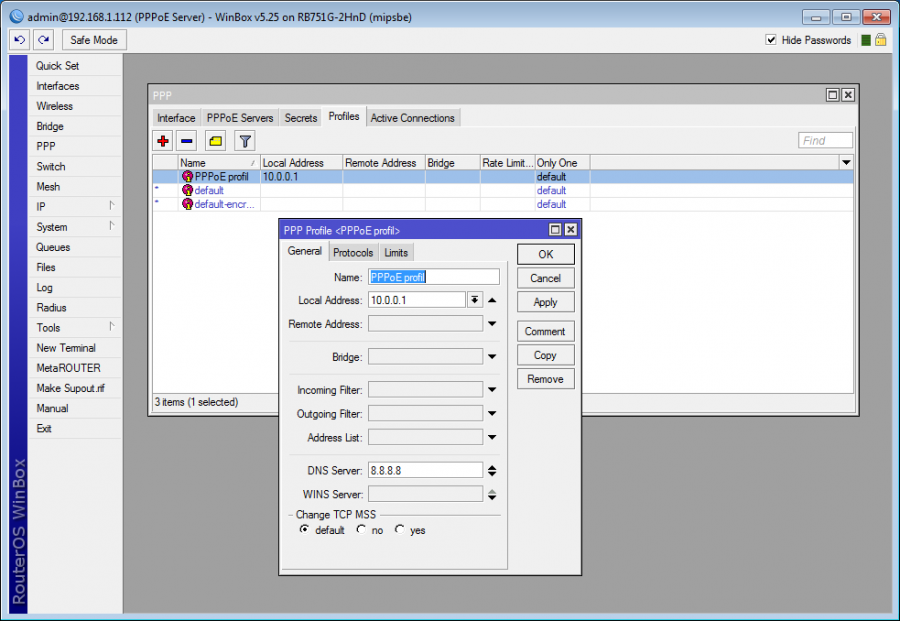 |
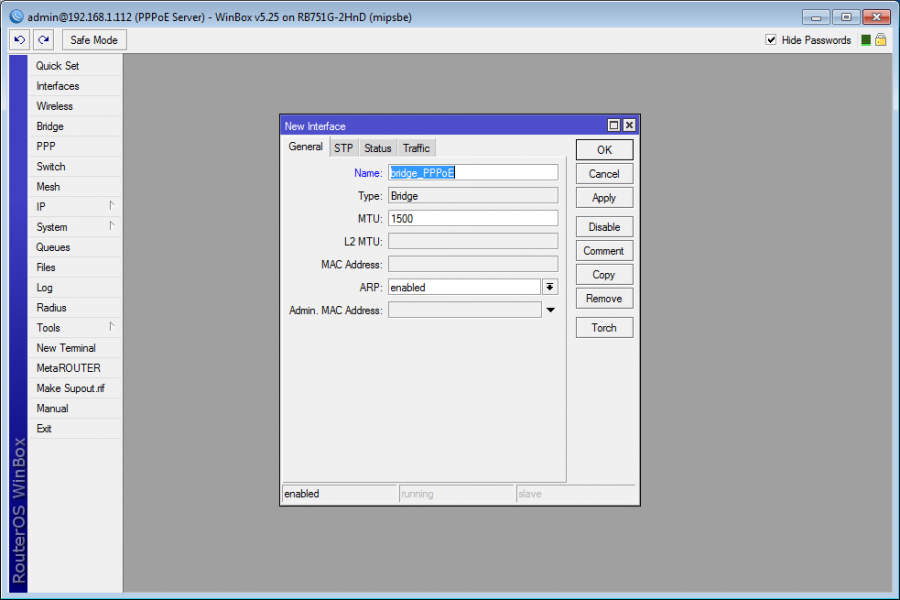 |
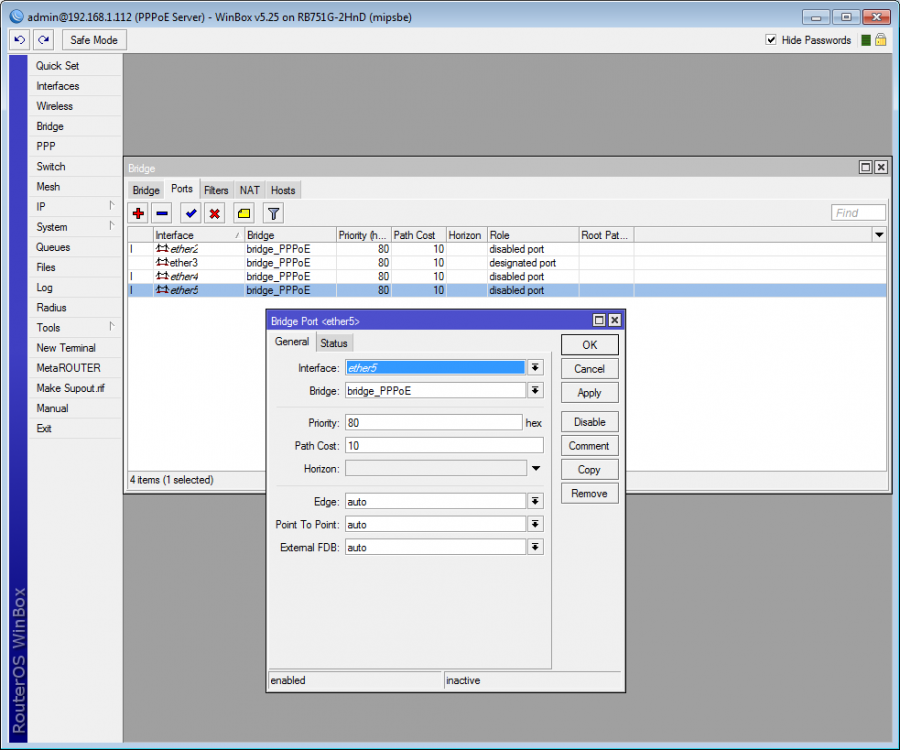
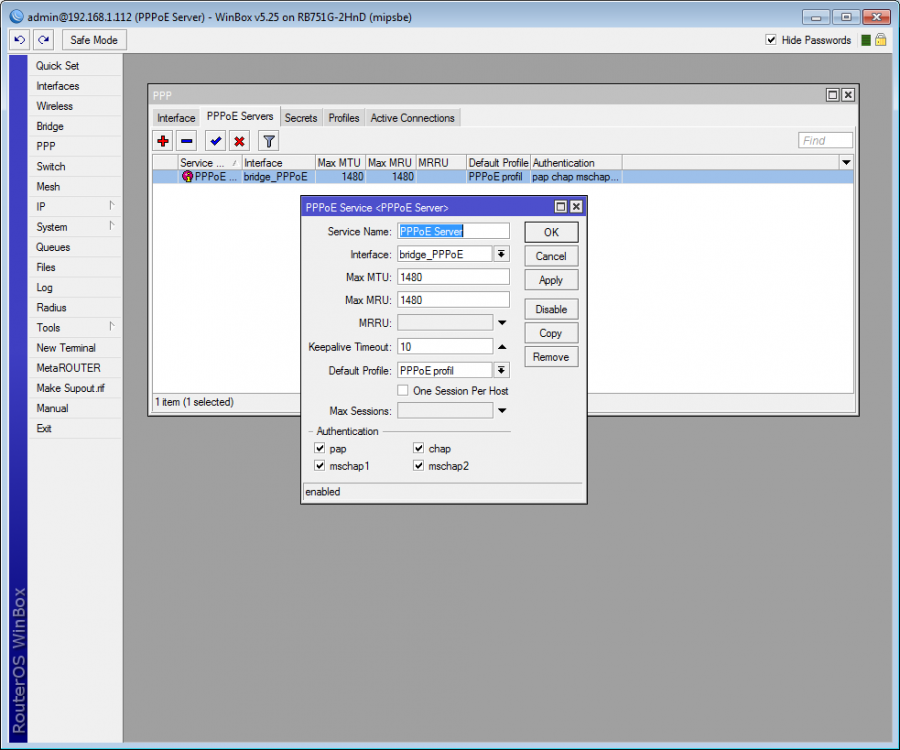
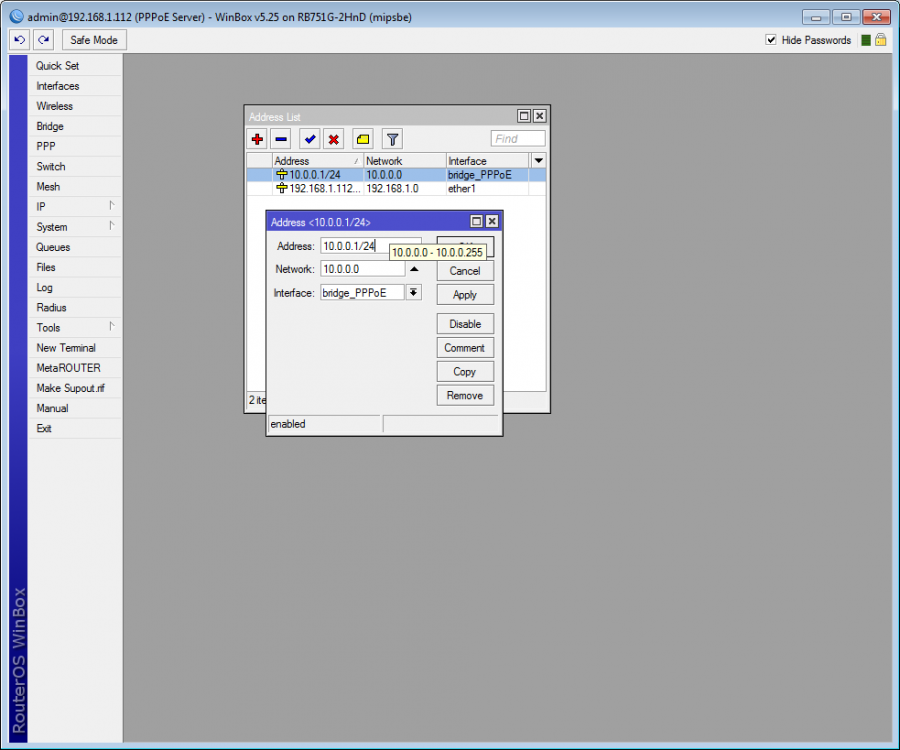
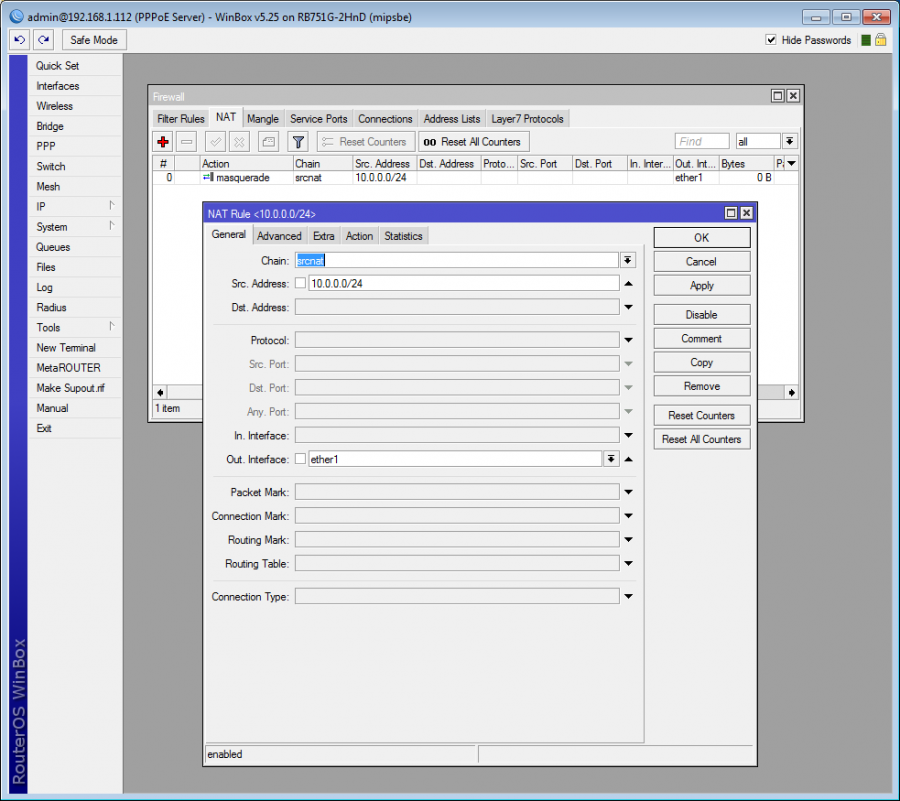
| Add ports to bridge PPPoE server is going to listen on bridge (eth2-5) or it could be listening on one port only, so you may add switch behind it to be able to connect more clients. | PPP / PPPoE Server - Enable PPPoE server to bridge_PPPoE with PPPoE profile | Set up IP address and network on bridge | Set up NAT at your discretion The example shown uses 10.0.0.0/24 |
 |
 |
 |
 |
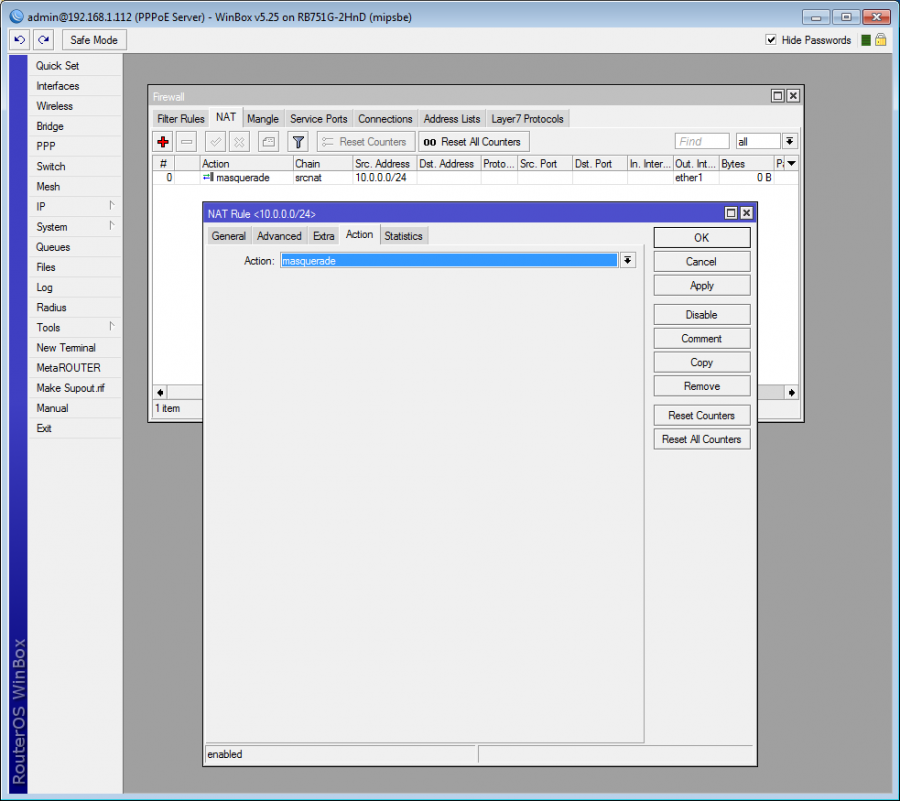
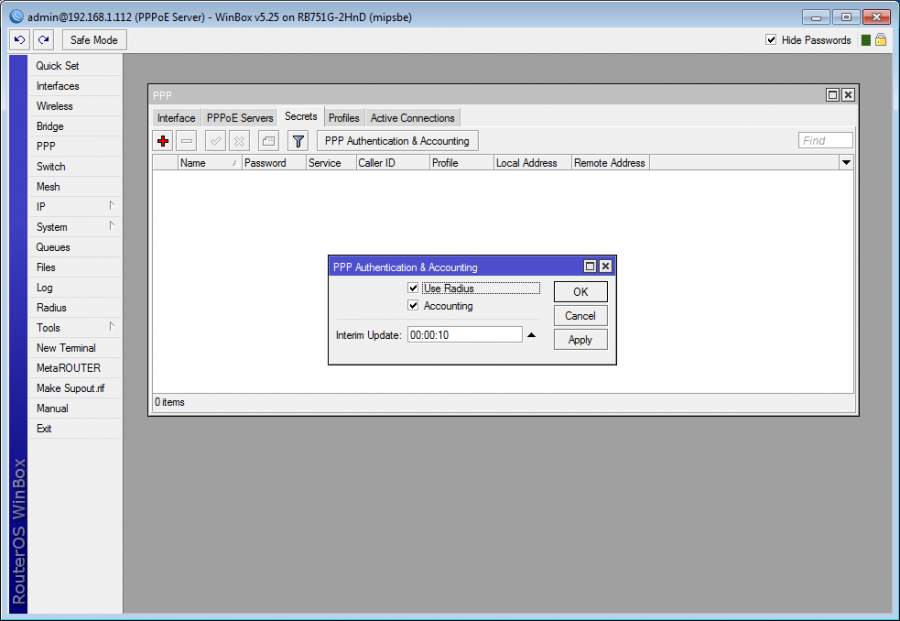
| Select Masquerade from Action menu | In PPP > Secrets, check Use Radius and set 00:00:10 in Interim Update | Radius menu - 192.168.1.200 is ISPadmin´s IP address where Radius server is running, and Secret is a password for Radius communication between MikroTik (Radius client) and ISPadmin (Radius server). The same password has been used in router setup in ISPadmin. | |
 |
 |
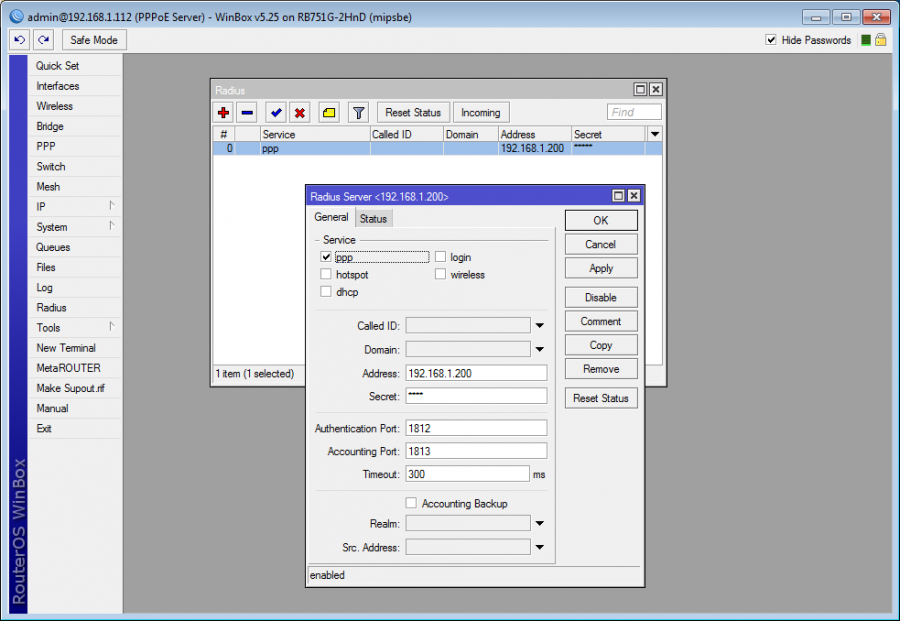 |
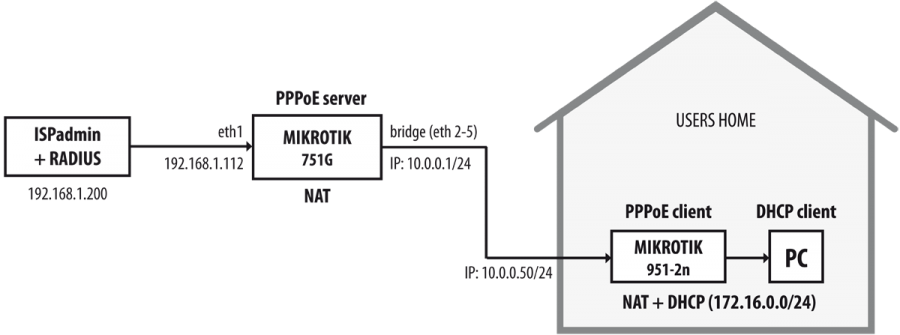
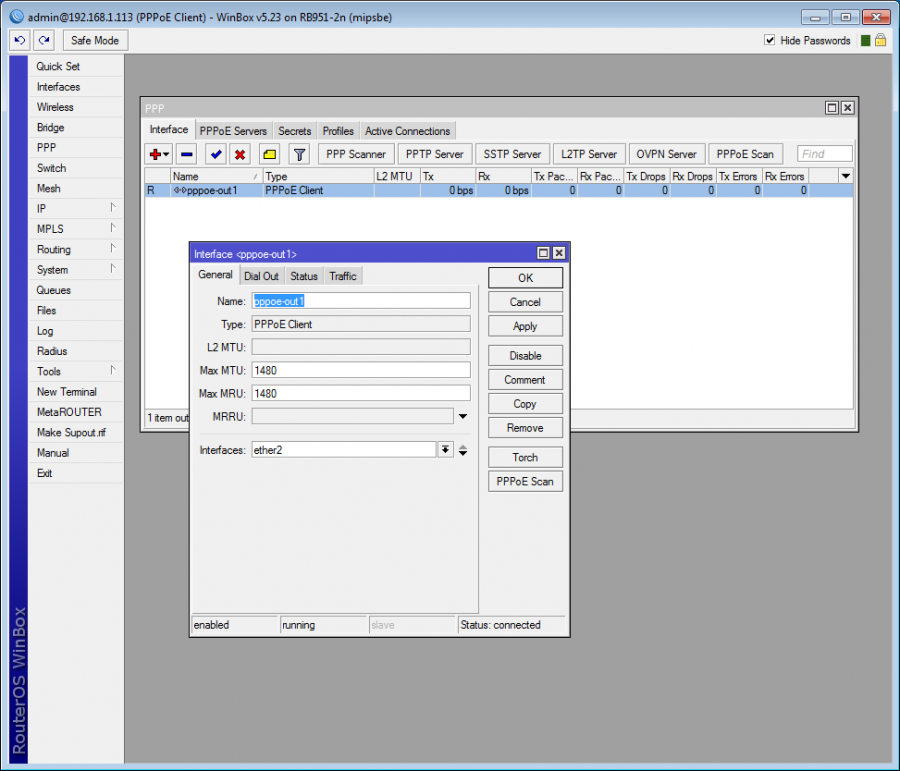
PPPoE Client
PPPoE client is any MikroTik located at client´s premises, which is connecting as PPPoE client to MikroTik (PPPoE server). Or it is possible to have PC with Windows as PPPoE client and access details are filled in directly in Windows.
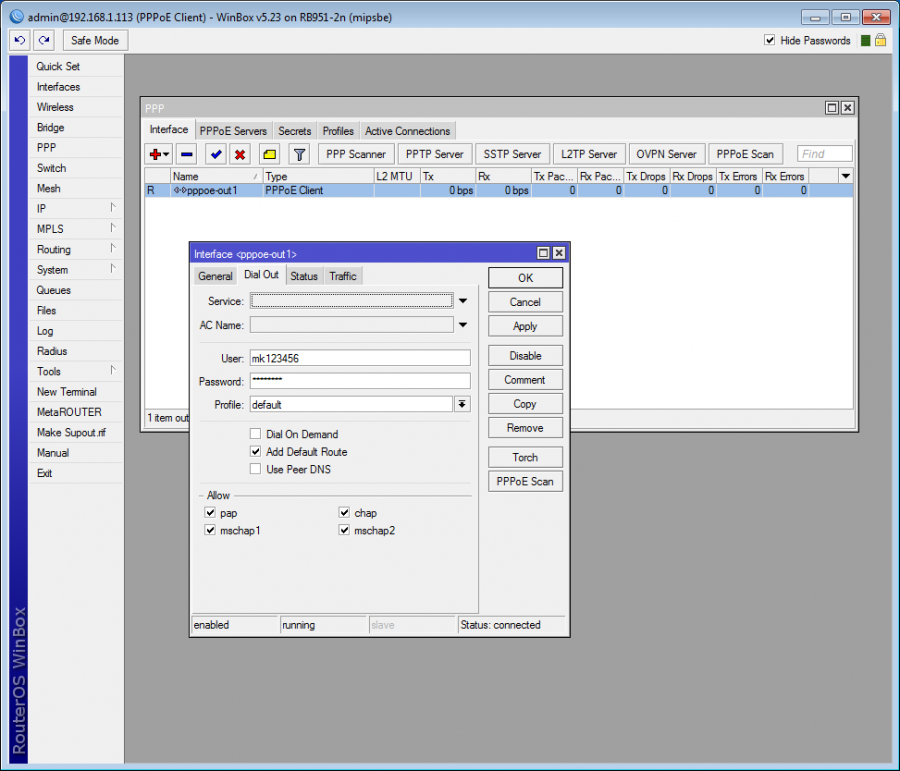
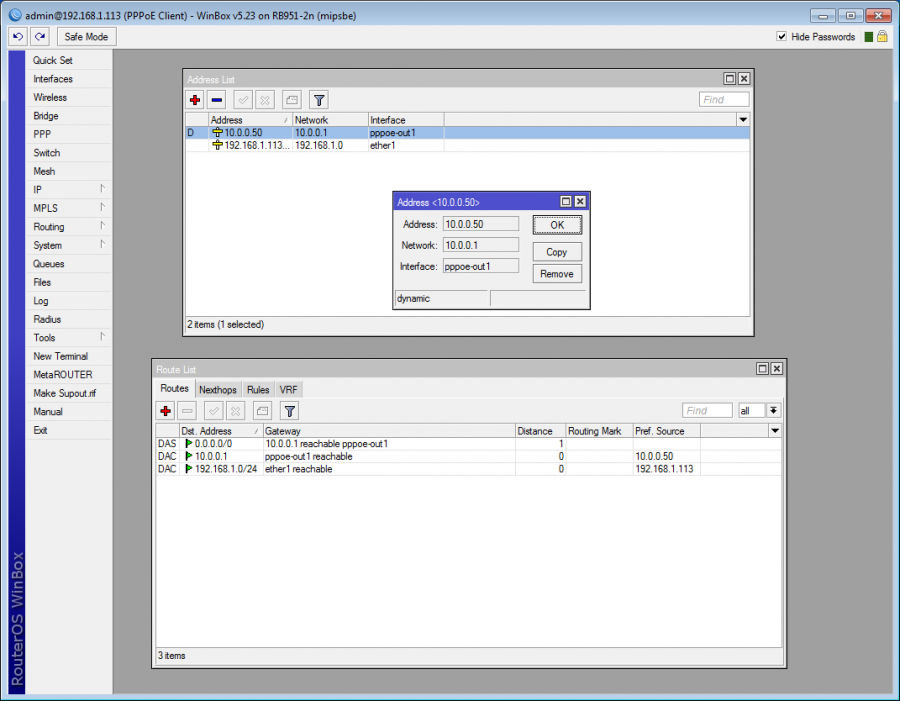
| Enable PPPoE for client e.g. on port eth2 | Fill in User name and Password for authentication via Radius User name and password for authentication via Radius are displayed in the Client card > Internet service | Check out that the client got IP address which was assigned for him/her when the new active service was created (10.0.0.50/24) and also it is necessary to check the default IP gateway of PPPoE server (10.0.0.1) |
 |
 |
 |
How to in ISPadmin
- Add a router: It is necessary to have a functional connection via SSH, API and SNMP to the router, and a Radius password.
- Add routed network to the router: From this subnet, ISPadmin will offer free IP addresses while adding new Internet service and chosen IP address will be set up to PPPoE client.
- Create Radius tariff
- Add Radius-type service to a client (You will see IP address, which is assigned to the client, from routed networks on MikroTik router.)
- In Hardware Routers Radius Account Statistics, you will see connection statistics of Radius-verified clients.
- In Hardware Routers Radius Active Clients, you will see if a client is on-line.
Problems with Radius
In case of any problems, it is advisable that you run Radius in a debugging mode directly from the console.
Firstly, turn running Radius off with:
/etc/init.d/freeradius stop
Then, start Radius with output to the console:
freeradius -X
You will see a detailed list of communication. I.e. verification requirements with server responses, and possible errors. Information on verification and connection time are clearly visible in Hardware Routers Radius Access Log, too.
When finished, start Radius with:
/etc/init.d/freeradius start