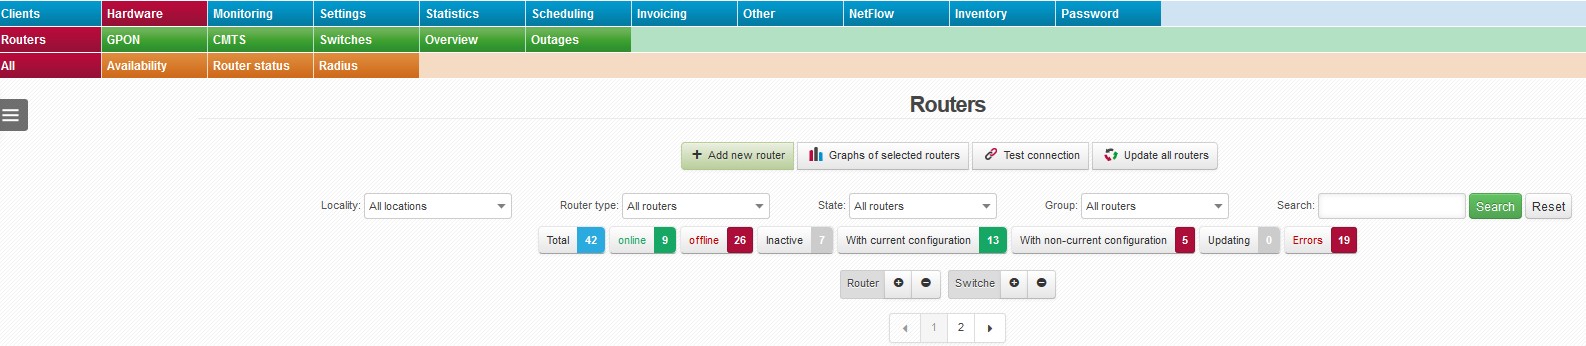
This bookmark displays all routers in the system. You can perform monitoring and configuration of all routers, headends, AP´s, switches, and other devices here.
The heading contains all buttons and options for this page. You can use them for filtering and searching the routers, or carry out bulk commands on all/selected routers.
Description of page heading
| + Add new router | Add new router to the system. |
| It displays graphs of selected routers, or all if no selection is made. Press |
|
|
It will test connection to all routers, and connected devices.
|
|
| It runs configuration update of all routers in the background. When you select this option, you´ll get a message that the update has been started. |
|
| Locality | Define it in Settings Code lists Locations. Geographical group for routers. You can use it for cities or town districts, counties etc. It helps you with schematic displaying of routers. If you administrate more cities or villages, you can use the names of specific cities and villages. If you administrate only a few cities, you can use names of city districts. If your network is very extensive, it is more suitable to select distribution of locations into districts or regions. With this distribution you will significantly make more clear displaying of routers in individual system screens. It is also possible to filter records and client according to this division. For example: bulk email and SMS. |
| Router type | Router type filter - see supported router types |
| State | Filter by states as defined in the system. |
| Group | You can define router groups in Settings Code lists Router Groups |
| POP | POPs are defined in Settings Code lists POPs |
| Search | Search a keyword, part of router name, IP etc. using full-text search. Click on |
| Router totals |
Buttons with number, e.g. on-line 10 display defined router statuses. Click on a button for further filtration of routers. Click on Reset to cancel the filters. With current configuration: Router with configuration identical to the one in ISPadmin |
| Router | Expands / closes the list of all routers with all details. |
| Switches | Expands / closes the list of switches assigned to routers. |
| 12 | You can browse routers by pages. This is handy especially when there are many routers in your system. You can define number of items per page in Settings System Settings General, ID item_to_page. |
All the routers are listed below the heading. On-line routers are marked with green stripe , off-line routers have red one. Click on to expand router detail.
Router description
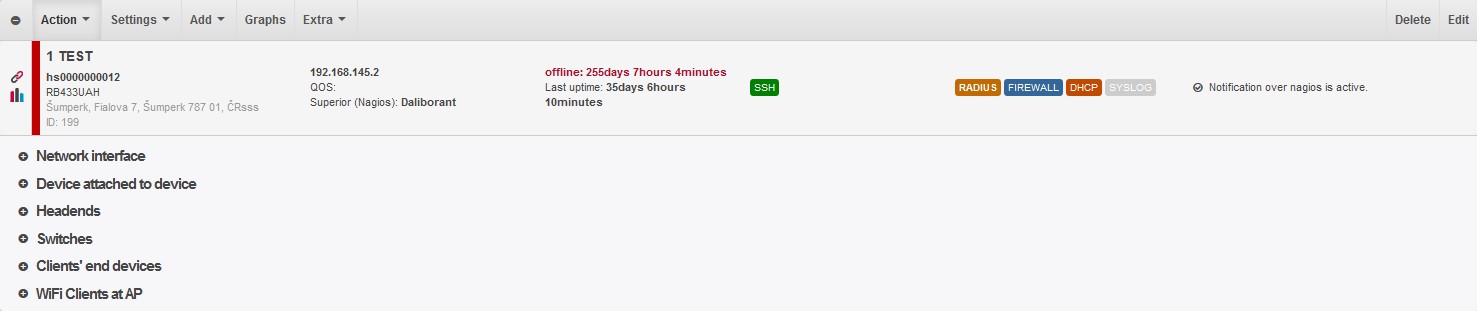
Colours of router heading
| Active router - see Editing a router | |
| Inactive router | |
| Router in monitoring mode - see Editing a router | |
| Error in communication with router |
The heading also contains a menu of available options for the router.
Action
Restarts router even if it is in monitoring mode. One has to have Master admin rights. Router may be rebooted over API if SSH connection is lost.
Update the router configuration
Updates router configuration
Emergency mode on router
When activating the emergency mode, you will be able to define % of the original client speed, and to include also dependent routers (Settings for dependent routers for Nagios is used). When deactivating the emergency mode, check again Include Dependent Routers to return back the original speed to dependent routers, too. You can use the emergency mode e.g. during an outage of backbone line when the service is re-routed to a slower line, and you need to decrease the speed for the line to be able to make it. Also available for opposite use, i.e. speed increase.
Test connection to router
See above
Settings
The system sets up its own queue tree in most cases. This one is a special client´s queue tree. It must be defined in Mikrotik manually and then loaded into the ISPadmin, and tested. QT can be selected only if 1:1 aggregation is used, otherwise the special QT is not displayed. Set up queue trees in Hardware RoutersAll.
+ Add new queue: Enter Queue ID, which is an identifier to be written to MikroTik, and Description (note to Queue).
Connect. points
Access point is wireless card of a router through which the client accesses your network. Set up access points in Hardware Routers All, Settings - Connect. points.
In global settings - Settings Syst.settings General, ID auto_assign_access_point, you can turn on automatic allocation of access point to Internet service. The function detects an Internet service without access point, yet with allocated MAC address. The MAC address is searched for on all routers with defined access point and active registration for WiFi card. If a match is found, the system automatically assigns it to Internet service, and save the information to log.
+ Add a new access point: Enter SSID (unique identifier of each access point), Description, and Net interface. You may move the red marker on the map to indicate the location of the connection point. Click on the number in Number of Clients to display clients´ list.
Alerts
More on alerts here.
Routed networks
More on routed networks here.
Virtual line
It creates a cumulative graph. It will sum up traffic-carrying capacity on each interface, and display them as a virtual line. This way, you can easily create a total traffic graph for a certain area or organization with numerous connections.
Add
Define net interface along with maximum throughput for download/upload.
Add headend
How to add a headend
Add device
How to add a device
Add switch
How to add a switch
Graphs
Extra
List of text and binary router backups. You can display or Save the backup.
Scheduled interventions
It displays a tab for adding a new task on a router.
Assigned goods
This is a list of goods assigned to a router. Red cross at the beginning of a row means that the goods was not transferred to pending items. Click on ![]() to display detailed information about client´s device, and also the movement history of this goods. Click on
to display detailed information about client´s device, and also the movement history of this goods. Click on ![]() to display a page for transferring the goods. Click on
to display a page for transferring the goods. Click on ![]() to assign the goods.
to assign the goods.
Photogallery
For every router, you can add photos, e.g. of a detail of connection or surroundings.
Documents
Upload documents related to a router, e.g. a lease agreement on place where router is placed.
Planned antennas on the router
Add and search planned antennas for a router.
Show on map
It displays a router on http://maps.google.com
Delete
Edit
HardwareRoutersAll, + Add new router or Edit in the details box of a particular router.
General information
| Router name | A name of your choice. It will be displayed in the details box of a given router. |
| Locality | Define it in Settings Code lists Locations. Geographical group for routers. You can use it for cities or town districts, counties etc. It helps you with schematic displaying of routers. If you administrate more cities or villages, you can use the names of specific cities and villages. If you administrate only a few cities, you can use names of city districts. If your network is very extensive, it is more suitable to select distribution of locations into districts or regions. With this distribution you will significantly make more clear displaying of routers in individual system screens. It is also possible to filter records and client according to this division. For example: bulk email and SMS. |
| POP | According to the configuration in Settings Code lists POPs |
| Group | According to the configuration in Settings Code lists Router groups |
| GPS | The coordinates of the location of a router. You can type them in or you can use the map at the bottom of the page to insert them (when you move the red pointer, the coordinates are updated automatically). |
| Address | The address where a router is located. It can be entered In any format. |
| Description | A description of a router + your notes This text is displayed when you hover over the name of a given router in the details box. |
| Internal ID | An ID of your choosing. It is used for internal purposes. This ID can also be seen in Hardware Routers Router Status Routers in the Internal ID column. |
| Superior device for Nagios | |
| Router | This item is used to define the logical topology for the Nagios system. |
| Device | This item is used to define the logical topology for the Nagios system. For example, an external device connected to a monitored router. A switch can be connected to this device. |
| Report outages for Nagios | If you check this box, device failures will be monitored for the purposes of Nagios. Also, you can select a group that will receive failure notifications - see Settings Code lists Nagios Contacts). |
| Router IP address | The IP address of the interface through which a given router communicates with ISPadmin. When adding an IP address it is being checked against the database immediately. If already in use in the system a warning message will be displayed with router name which is used with the IP address. You will be able to save the form anyway. |
| Router type | The type of the router used See supported types of routers. |
| QOS doing on router | Here you can specify on which router QoS (shaping) will be done. It can be done either locally (on the very same router) or on a different router (on the router of your choosing). |
| Queue tree type | The system sets up its own queue tree in most cases. This one is a special client´s queue tree. It must be defined in Mikrotik manually and then loaded into the ISPadmin, and tested. QT can be selected only if 1:1 aggregation is used, otherwise the special QT is not displayed. Set up queue trees in Hardware RoutersAll. |
| Router is active | The activation / deactivation of a router in the system (in the event of a failure or a replacement). |
| Only router monitoring | If a router is in monitoring mode only, the system does not apply any configuration changes to it - it only passively gathers information. |
| Use API | A new way of communication with MikroTik routers. We recommend that you activate this communication interface. ISPadmin is able to retrieve more data through API than through SSH. |
| Use DHCP | If the system knows IP and MAC addresses, it can assign DHCP leases. The activation of the DHCP server and the assignment of addresses are automatically reflected in the configuration of a given MikroTik router (DHCP Relay). On every router update, before uploading the DHCP leases, the system removes dynamicly assigned DHCP leases. |
| Syslog monitor | Here you can activate/deactivate the sending of syslogs from routers to the ISPadmin server. |
| Apply firewall rules | If the box is checked, all clients entered into ISPadmin are added to the configuration of a given router. The whole range is dropped at the end. This ensures that no unauthorised access to this router is allowed. However, if you wish to add clients (step by step) to the router inISPadmin from your old system, you have to temporarily disable this option. Otherwise, the system would "cut off" your original clients. |
| Ping size | Here you can specify the ping size. |
| SNMP community | The password needed for retrieving SNMP data from a device. It can be set in Winbox in the IP->SNMP menu. |
| SNMP port/SNMP version | Fill in only if you use a different port/version from the default one. |
| SSH user/password | The username/password needed to log in to a router through SSH. |
| SSH port | Default: port 22. If you use a different port, change this setting accordingly. |
| API port | Default: port 8729. You can enter a different one. |
| Web interface port | Again, if you use a different port from the default one, enter it here. |
| MAC filter |
It is a firewall rule. An IP-MAC binding is established. Clients in whom this binding cannot be established are allowed to connect to their corresponding APs, but all their packets are dropped there. More about the MAC filter in the FIREWALL section here. |
| Use wireless MAC filter | The restriction of access to an AP by means of Wireless Access List. API must be functional for this feature to work. Clients whose MAC addresses are not listed among allowed addresses will not be able to connect to their corresponding APs. If this filter is active, clients´ MAC addresses will be stored in Mikrotik in /interface wireless access-list. MAC address of end device from client card is stored in wireless filter. If MAC address is not listed, and client´s MAC address is listed instead, this MAC address is stored in Mikrotik. |
| List of MAC addresses | The system automatically loads MAC addresses from a router once an hour. |
| Activate radius | Activate the RADIUS technology - a wide range of authentication options and comfortable provision of APs to mobile clients. You can use the Radius module only if you acquired a licence for it beforehand. Fill in the Password field. |
| Login of technicians to Mikrotiks via Radius | You can make use of this feature if you want to restrict access to a certain router. |
| Router restart | If a router freezes from time to time, you might want to schedule an automatic restart here (ideally to take place during the night) and its periodicity. |
Firewall
Here you can add your own firewall rules for a given router. More about firewall rules in the FIREWALL section here.
<h3 class="textLabel">Routery</h3>
<ul>
<li>Nyní se při přidávání nového routeru ověřuje zadávaná IP adresa ihned po vyplnění políčka ve formuláři a nečeká se až na ukládání fomuláře. Je-li IP adresa již použita, zobrazí se ihned pod políčkem informace, který router má tuto adresu použitou. Formulář je možné uložit i s již použitou IP adresou.</li>
</ul>
Basic router info

- name, ID, routerboard type/routerOS, address
- IP address, QOS (router, on which is done QOS, if not locally), superior device
- offline time (+Last uptime) or ping, uptime, CPU, router temperature, usage of flash memory (hover over the icon with % to display total amount of flash memory + usage in MB) for online routers.
- API SSH SNMP: information about active router interface (active interface is highighted in green)
- The following settings are done when adding/editing a router
WLAN FILTER Wireless filter is implemented. MACFILTER Click on the icon to display an overview of clients with configured MAC address. Here you can click on Delete all MAC a. to delete all MAC addresses from clients. This way you will enable access to clients, and MAC address will not be checked. MAC address will be read again within an hour (if client is connected). FIREWALL Active firewall on a router DHCP Active DHCP server - router provides IP addresses to other devices. RADIUS Click on the icon to display Radius information on a router.
Use of Unlock button:
When a Radius-type client connects to the Internet via a certain router for the first time, and the Internet service settings are Lock user, then the client is locked to the router used for the first access, and no other router will be used for the Internet connection.
However, if you wish to allow the client to connect via a different router (just one), click on Unlock. Then the client only needs to connect to the Internet via a different router, which will then be used for the access.
If you want to allow the user to log in to Internet from any router, do not tick in the Internet service settings - Radius the option Lock user.
SYSLOG Click to display syslog information. You will see all logged events as selected in router settings. All this information can be clearly classified according to the router priority (event type) or searched in the columns IP and Message by fulltext by pressing Search. You can also delete all records by pressing the Empty button. - Nagios notification is/is not active: All routers and attached devices are automatically monitored by Nagios system. Nagios configuration is done automatically according to the settings from the admin interface.
Overview of router devices
| Network interface | A list of added network devices Click on |
| Device attached to device |
List of attached devices
|
| Headends |
A list of router headends with frequencies
|
| Switches |
A list of connected switches - see Switches. |
| Clients' end devices |
Type of end device installed at client´s. Set it up in Hardware Settings End devices.
|
| WiFi Clients at AP |
|