Installation file
The most common way to install ISPadmin is using installation DVD which is available at promo events, or downloadable from download.ispadmin.eu. It is a ispadmin-XX-64bit-debian7-DVD.iso file (XX represents ISPadmin version).
ISPadmin runs on a Debian GNU/Linux distribution which is included in the installation DVD so there is no need to have a Linux installation ready prior to ISPadmin installation. Just burn the downloaded ISO file onto a DVD and follow the instructions.
The following procedure will guide you through preparation of disks, installation, and subsequent configuration of ISPadmin.
1. Check HDD settings in BIOS.
Switch to BIOS while booting up (by pressing Del / F2 or similar), and check that Advanced Host Controller Interface (AHCI) support is enabled for SATA hard drives. If your motherboard does not support AHCI, no problem. However, if there is such an option enable it. If you leave this option disabled the system will work with SATA drives in a mode compatible with older IDE drives, and I/O speed will be much lower than AHCI-enabled option.
2. Boot from DVD
Enable booting from DVD/CD in BIOS. Insert installation DVD into the drive and boot from it. When the system is launched, installation environment will be prepared and a welcome screen is displayed.
3. Configure disk partitions
3.1 Method A – software RAID1
The model installation assumes two identical SATA disks from which a software mirror (RAID 1) will be created later on. It is used in cases when the server has no HW RAID.
First hard drive is connected as /dev/sda and the second one as /dev/sdb.
If your hard drives are up to 160GB in size, create only 2 new disk partitions. One partition for creation of software RAID (md0 for the system), and the second one for SWAP purposes. First of all, create partition for system installation. The capacity of the first partition will be determined by the deduction of a maximal capacity of the disk and a space which is reserved for the storage space, approx. 2 to 4GB. Then from the remaining space a second primary partition will be created, where also the SWAP will be situated.
If you have greater hard disks (250GB, 320GB, 500GB, 1000GB ), you´d better separate the system from the backups and the NETflow data to your own partitions. So create the first system partition of approx. 100GB (md0 array), the second partition is for SWAP (approx. 4GB), and the last partition for backup/NETflow data (md1 array).
If there is already any SW raid activated, you have to delete it, otherwise it would be impossible to manipulate with the disk partitions. If not, you may continue.
mdadm --manage --stop /dev/md0
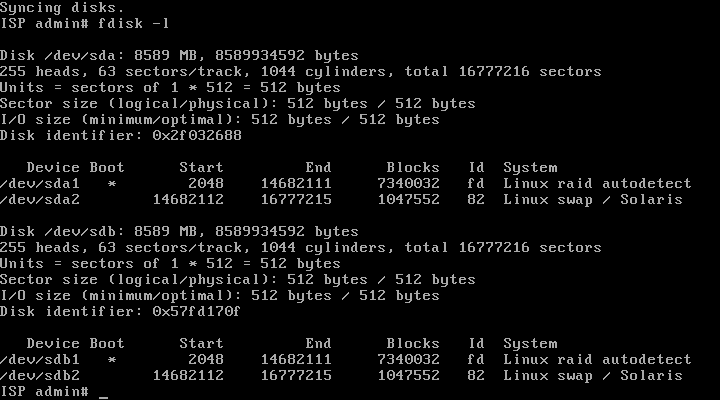
Run fdisk -l to see if the system has detected harddisks and how they are marked.

Often they are marked as /dev/sda and dev/sdb, yet they can be marked differently (e.g. /dev/hda).
Run fdisk with /dev/sda parameter (first harddisk).
fdisk /dev/sda
List disk partitions using "p” and, if applicable, delete already created ones using "d” to make sure the disk is empty.
If the disk is empty start creating a new primary partition using "n”.
- choose p for primary
- leave default partition number
- leave default first sector
- enter last sector according to your desired partition size, e.g. +7G
Create SWAP partition from remaining space accordingly.
List partitions to make sure they are big enough. If not, discard all partitions and start over.
The first - system - partition must be of FD (Raid Autodetect) type, and the second one - SWAP - of 82 (Linux swap / Solaris) type.
- press t
- select partition 2
- enter FD, or 82 for SWAP
Then mark the first - system - partition for booting.
- press a
- select partition 1
Check again, if partition size / type is correct as well as boot flag.

The last step is to save changes in fdisk which updates MBR table.
- press w to save changes
Configuration of the first disk /dev/sda is finished now. Apply the same procedure to /dev/sdb. First, run fdisk /dev/sdb and repeat previous steps on the second drive. If you have a big harddisk, create 3 partitions instead of 2.
ATTENTION! Created partitions must be identical on both disks! Check it by running fdisk -l.
Creating disk array RAID1 (mirror) and formatting
You now have to create RAID1 (mirror) from first partitions of both disks /dev/sda1 and /dev/sdb1. To do so, use
mdadm --create /dev/md0 --level=1 --raid-devices=2 /dev/sda1 /dev/sdb1
Display raid status by
cat /proc/mdstat
Here you can see that the array:
- is named /dev/md0,
- is active (md0 : active raid1),
- comprises of 2 disks (sdb1[1] sda1[0]),
- has both disks in U status, which means UP ( [2/2] [UU] ).
The array will be fully redundant upon completion.
Do not restart server prior to synchronization of disks!
If you use a big harddisk and create 3 partitions, you initiate second RAID1 by:
mdadm --create /dev/md1 --level=1 --raid-devices=2 /dev/sda3 /dev/sdb3
Finally, format partitions. Formatting bigger harddisks may take up to several minutes.
mkswap /dev/sda2 #creation of file system for swapping to second partition of first disk
mkswap /dev/sdb2 #creation of file system for swapping to second partition of second disk
Formatting possible second RAID array
mkfs.xfs /dev/md1 ### formatting second md1 array (physical partitions /dev/sda3 and /dev/sdb3) to xfs file system
Why using xfs for second data partitions? It is more efficient with big disk partitions and big amount of small files - Netflow data typically. Always use ext4 native file system for system partition (array md0)!
3.2. Method B - hardware RAID1, virtual machine or one disk
It is assumed that you have a server with RAID controller, and disk mirroring is done on HW level. Follow the same procedure for servers with one disk only. Just one disk is passed to the OS, e.g. /dev/sda.
Run fdisk with /dev/sda (change accordingly) parameter.
fdisk /dev/sda
List disk partitions using "p” and, if applicable, delete already created ones using "d” to make sure the disk is empty.
If the disk is empty start creating a new primary partition using "n”. In case of disk bigger than 200GB, we recommend you create 3 partitions. First partition is for system, the second one for SWAP, and the third one for data.
- choose p for primary
- leave default partition number
- leave default first sector
- enter last sector according to your desired partition size, e.g. +7G
Create SWAP/data partition from remaining space accordingly.
List partitions to make sure they are big enough. If not, discard all partitions and start over.
The first - system - partition must be of Linux 83 type, and the second one - SWAP - of 82 (Linux swap / Solaris) type. Modify SWAP partition.
- press t
- select partition 2
- enter 82 for SWAP
Then mark the first - system - partition for booting.
- press a
- select partition 1
The last step is to save changes in fdisk which updates MBR table.
- press w to save changes
Finally, format partitions. Formatting bigger harddisks may take up to several minutes.
mkfs.ext4 /dev/sda1
mkswap /dev/sda2
Format eventual third data partition, if created.
mkfs.xfs /dev/sda3
4. Unpack data archive
Check if ispadmin.tgz source archive is available. It should be located in /install if DVD-ROM drive is correctly detected.
ls -la /install
If the installation archive is not present in /install, DVD-ROM drive might not have been detected correctly. Therefore, you have to connect the content of installation DVD manually. To detect the device with the installation DVD run dmesg | more, which will list, page by page, reports about the detection of individual components of the server during the start of the system.
mount /dev/XXX /install ### replace XXX with the device representing DVD-ROM drive which is, most often, hdc, hdd, or sr0.
Mount system partition to /hd and unpack data from /install/ispadmin.tgz into it.
mount /dev/md0 /hd ### mount created disk to /hd where you will unpack installation files (for HW RAID), or for one disk enter /dev/sda1
gzip -d < /install/ispadmin.tgz | tar xvf - -C /hd ### unpacks installation archive into created disk
Modification of partitions in configuration file /etc/fstab. For SW RAID, modify according to the following:
nano /hd/etc/fstab
/dev/md0 / ext4 errors=remount-ro 0 1
/dev/sda2 none swap sw 0 0
/dev/sdb2 none swap sw 0 0
/dev/md1 /data/ xfs defaults 0 2 ## only if you have data partition
Modification of partitions in configuration file /etc/fstab. For HW RAID, or in case of one disk on server, modify according to the following:
/dev/sda1 / ext4 errors=remount-ro 0 1
/dev/sda2 none swap sw 0 0
/dev/sda3 /data/ xfs defaults 0 2 ## only if you have data partition
5. LILO boot loader setup
When the installation is completed, set up boot sector and create a boot loader. Switch to the new disk and edit /etc/lilo.conf.
mount -o bind /proc/ /hd/proc/
mount -o bind /sys/ /hd/sys/
chroot /hd
nano /etc/lilo.conf
large-memory
prompt
disk=/dev/md0 ### for HW RAID, or for one disk /dev/sda
#bios=0x80
compact
timeout=50
default=ISP_admin
boot=/dev/md0 ### for HW RAID, or for one disk /dev/sda
map=/boot/map
raid-extra-boot=mbr-only ### comment for HW RAID, or for one disk
root=/dev/md0 ### for HW RAID or for one disk /dev/sda1
image=/boot/vmlinuz-3.18.2
label=ISP_admin
read-only
Then run lilo to create boot sector.
lilo
6. Configuration of network connection
To have the server with a new IP address after the restart instead of the default one 192.168.1.100, you have to save new address details into /etc/rc.local: IP address, network mask and default port. Just edit default addresses in commands ifconfig and route.
7. Finishing the installation
Leave chroot environment.
exit
Unmount disks.
umount /hd/proc/
umount /hd/sys/
umount /hd
Remove DVD from the drive so that newly installed system would be loaded after restart. If the drive is connected through SATA, everything is OK, if it is connected through IDE, you have to specify which block device it is. If the command does not work, eject DVD manually.
eject or eject /dev/hdc or eject /dev/sr0
Finally, restart the server to load the new system.
reboot -f
Newly installed system is being loaded after restart. If not, check booting sequence in BIOS configuration, and edit first item to be system hard drive.
If you have done everything as needed, the system boots up and you can log into it. Default login credentials are:
Command line
- user: root
- pass: ispadmin
Web interface:
- user: admin
- pass: ispadmin
8. Configuring the installation
The system needs to be configured after installation. This usually includes: configuration of domain names, web server and administrator passwords, and activation of licence.